Sending email for free using Cloudflare Worker: Step By Step Tutorial
Somewhere in 2022, Cloudflare posted a blog announcing their partnership with Mailchannels, an email security company. Out of this partnership, they’re announcing something that blew my mind:
MailChannels has created an email sending service specifically for Cloudflare Workers that removes all the friction associated with sending emails…. But the absolute best part? Thanks to our friends at MailChannels, it is completely free to send email
I repeat this again: “Completely free to send email” 🤯 I’m not sure why this doesn’t get enough attention and recognition from the developer community. Perhaps it’s because Cloudflare doesn’t have 60,000-person sales team.
What can you use this for? You can send email for transactional email like transaction receipt, user registration confirmation, password reset. You should be able to send marketing emails using this as well but you’ll need to build the audience segmentation & metric collection system on your own (tracking email click & open).
Let’s see how you can use this for your company.
Prerequisites#
- You already have a Cloudflare account
- You already have a domain where you can update the DNS records
- You have create-cloudflare npm package installed
I manage my domain in Cloudflare so the screenshots in this article will reflect that. You DON’T need to use Cloudflare to manage your domain just to use this feature.
Step #1 - Setup SPF record#
Create a new TXT record at root level on your domain with the following value:
v=spf1 a mx include:relay.mailchannels.net ~all

The purpose of SPF record is to authorize Mailchannels to send email on behalf of your domain.
IMPORTANT: If you already set SPF record for another email service (which means you already authorize another email service to send email on your behalf), you might error. You should only keep 1 TXT record for SPF at one time.
You may want to verify the DNS change is propagated using this command$ dig -t txt yourdomain.com.
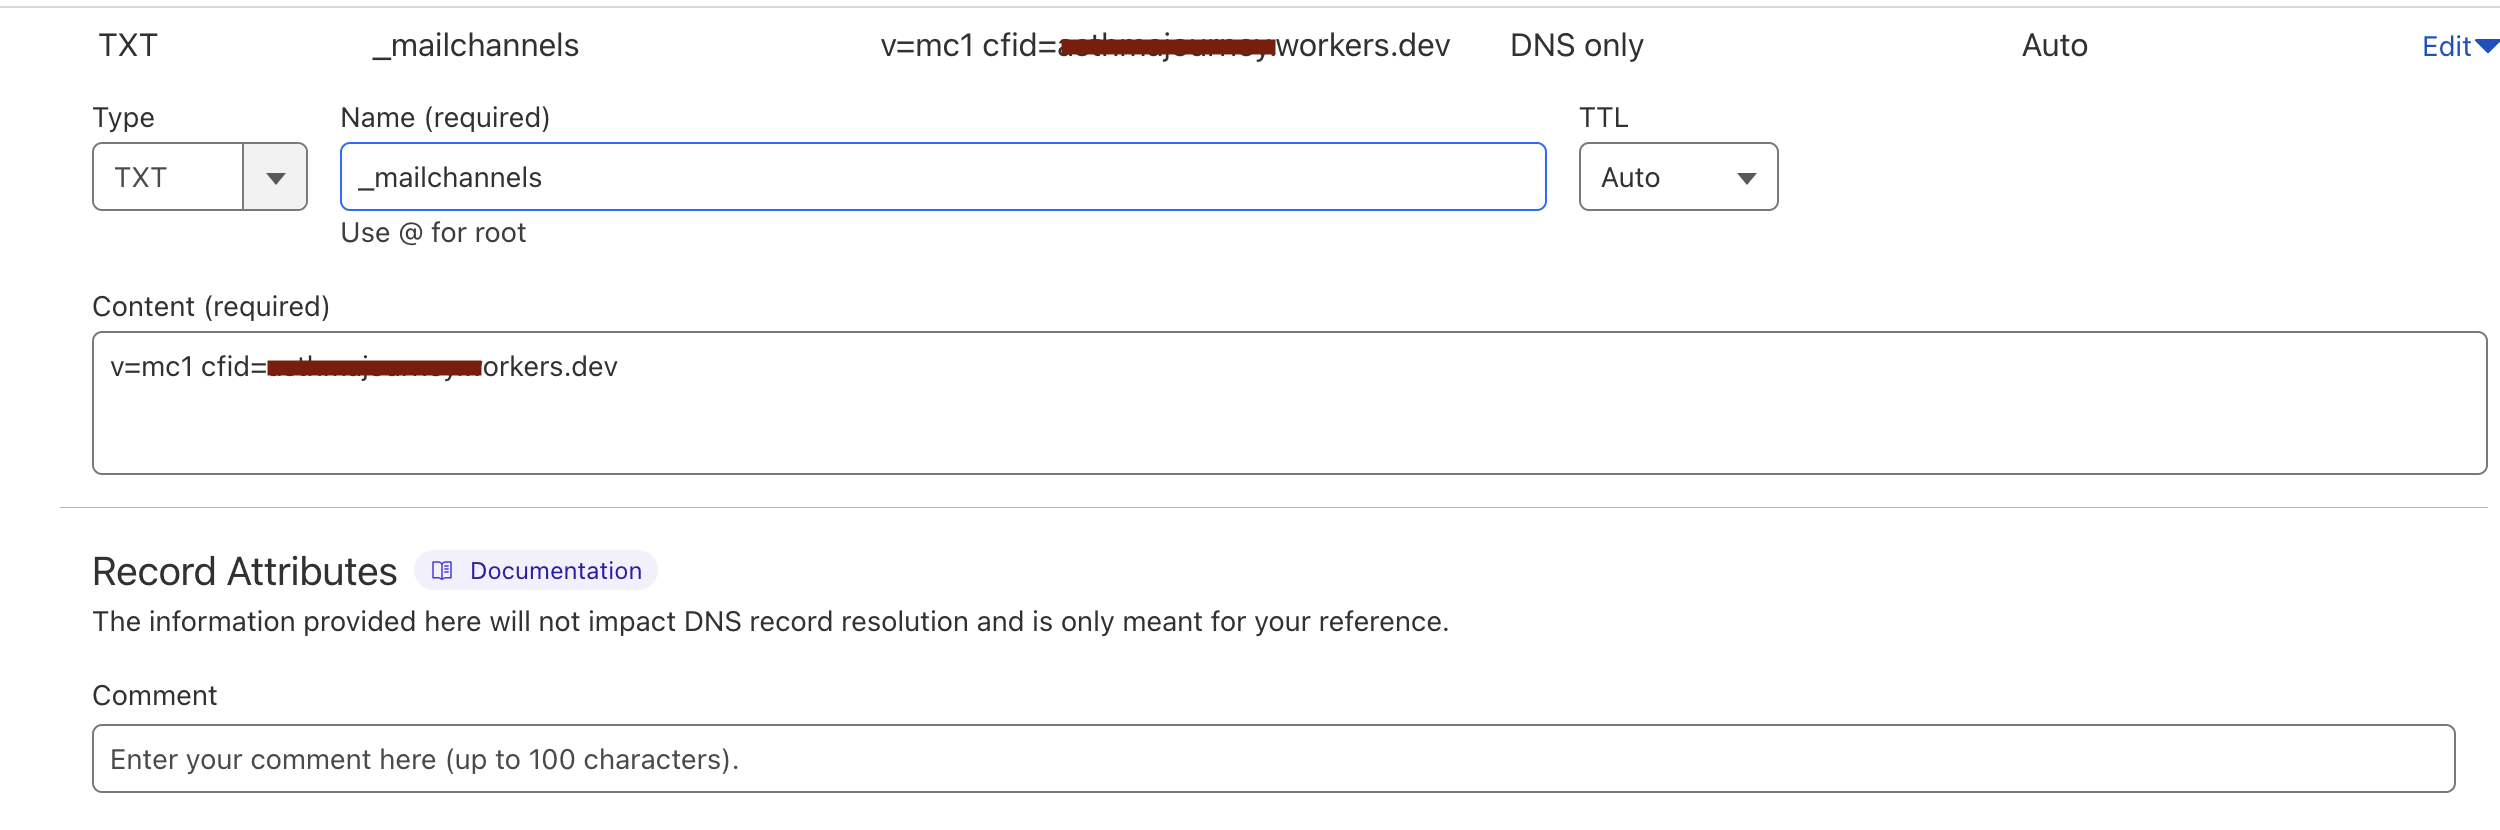
Step #2 - Setup domain lockdown record#
Create another TXT record at _mailchannels.yourdomain.com on your domain like below:
v=mc1 cfid=<cloudflare worker subdomain>.workers.dev
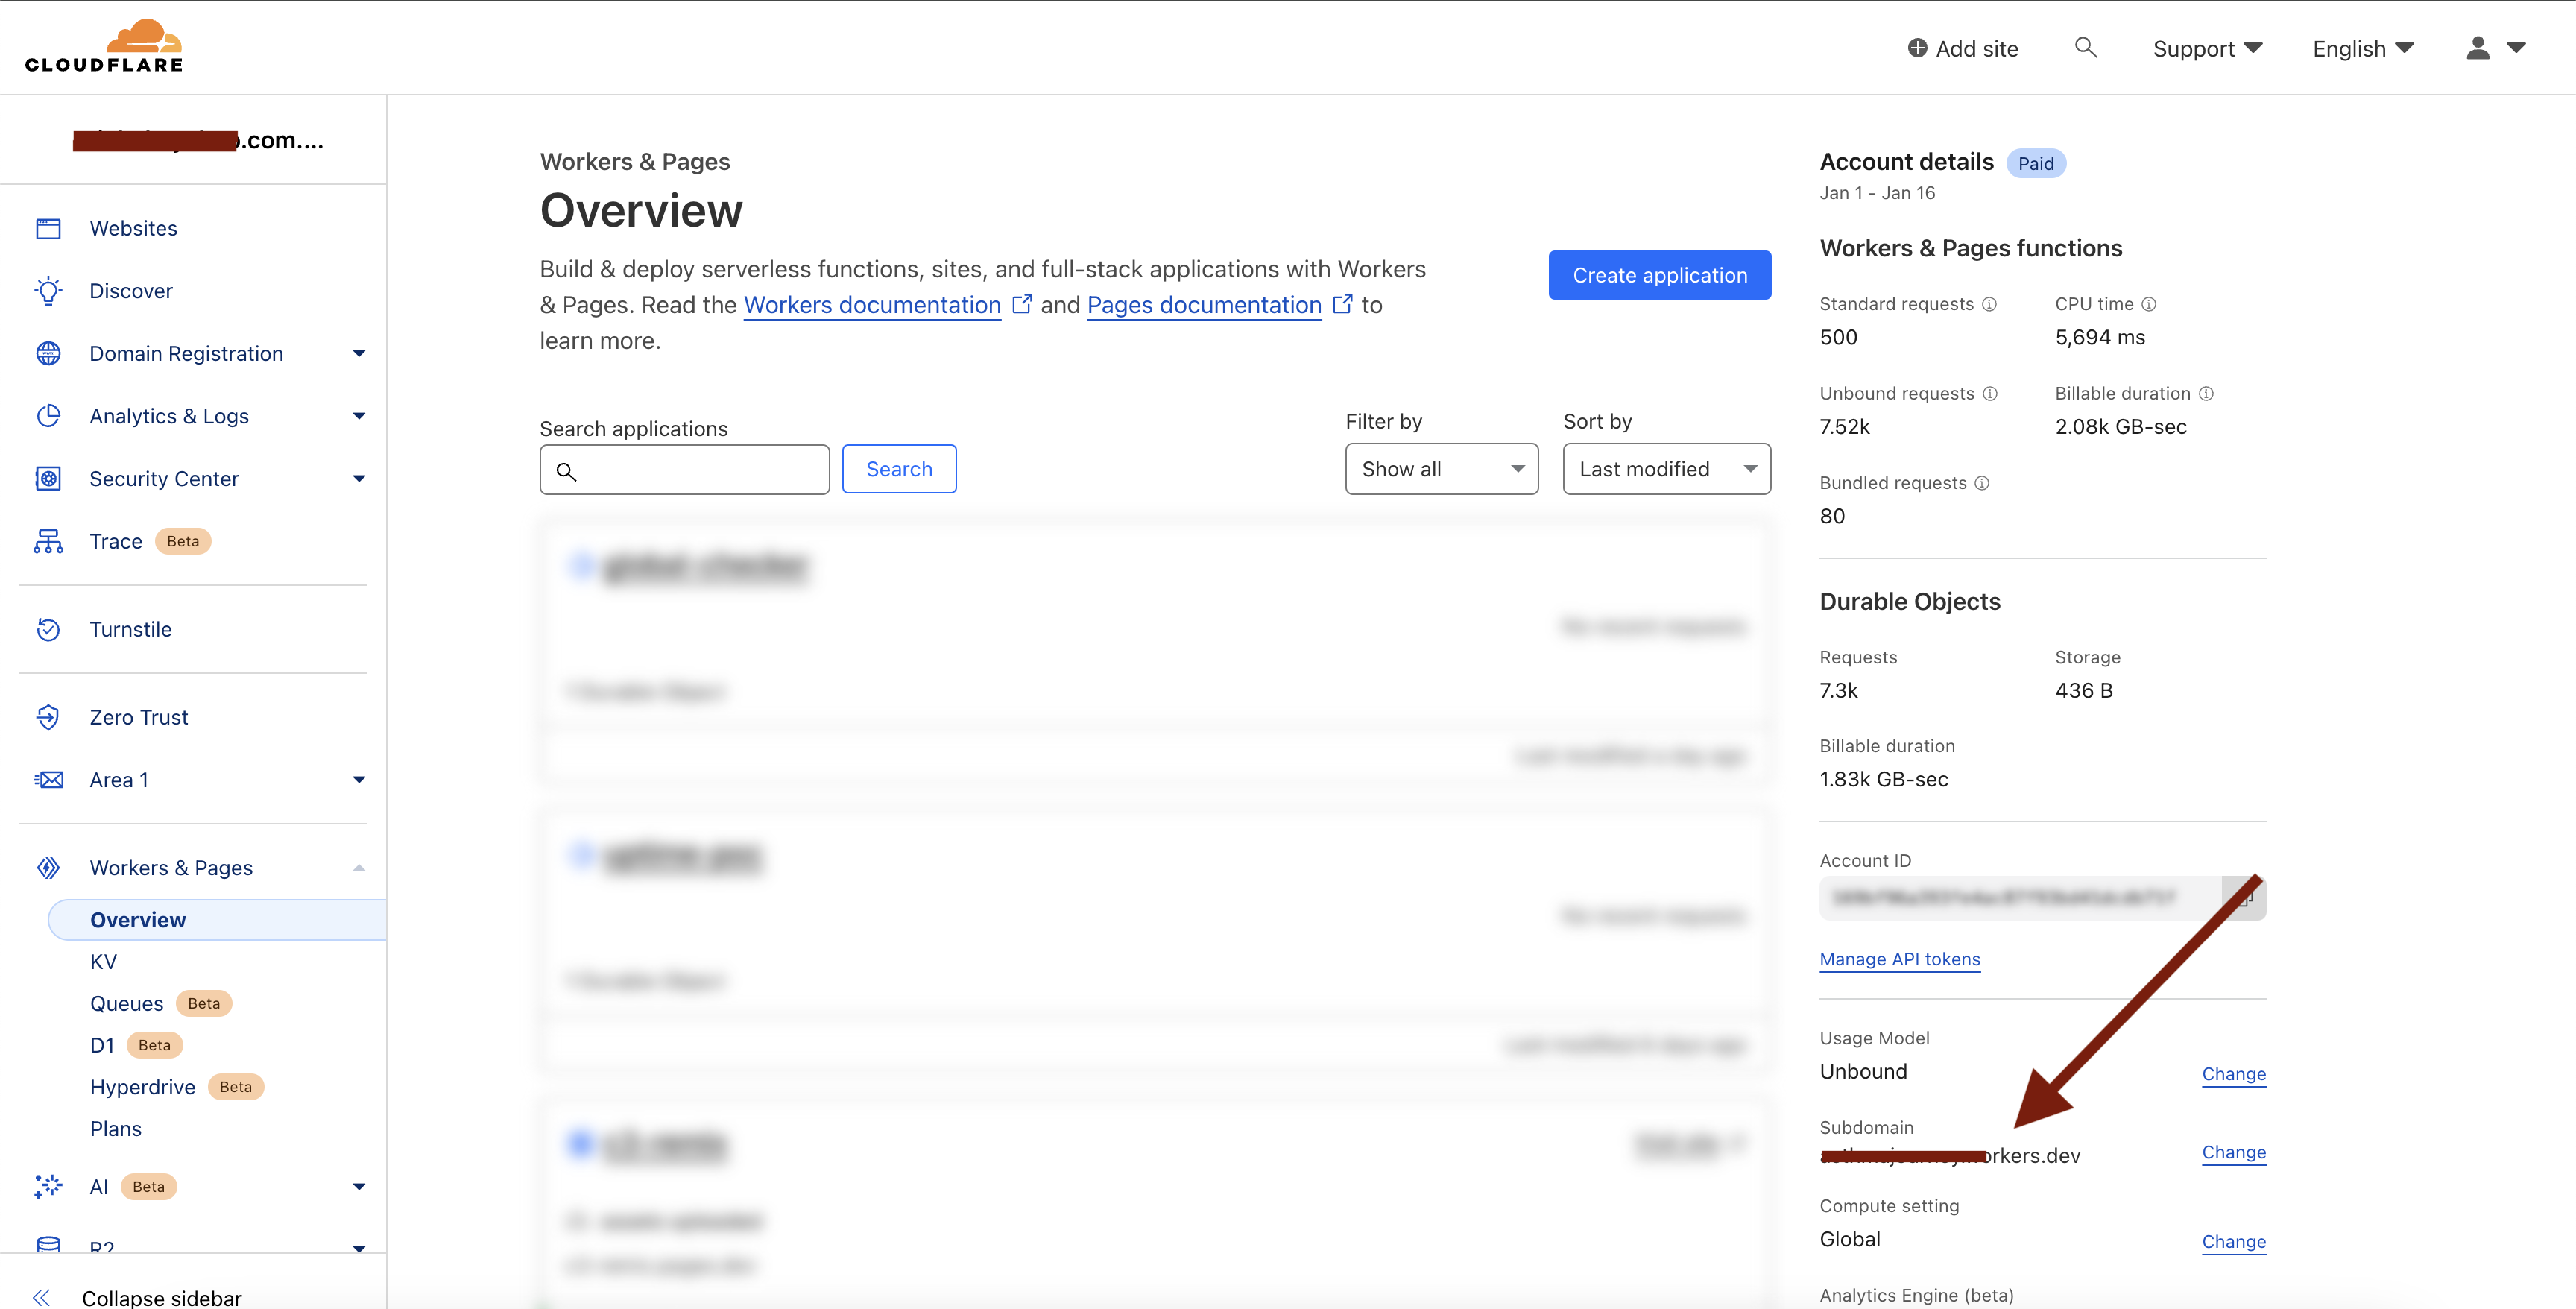
How do I know my Cloudflare worker subdomain? You can go to “Workers & Pages” section in your Cloudflare dashboard like so:
You may want to verify the DNS change is propagated using this command$ dig -t txt _mailchannels.yourdomain.com.
Step #3 - Create & deploy a Cloudflare Worker code#
First, initalize a Cloudflare boilerplate JS code using the following command
$ npm create cloudflare\@2 email-service -y -- --wrangler-defaults
$ cd email-service
And then replace the content of src/index.ts with the following code:
export default {
    async fetch() {
      // For testing purpose, replace this with your personal email
      // so that you can see the message sent to your inbox
      const receiver = 'youremail@gmail.com'
      // Replace <yourcompany.com> with the domain you set up earlier
      const sender = 'you@yourcompany.com'
      const send_request = new Request('https://api.mailchannels.net/tx/v1/send', {
        method: 'POST',
        headers: {
          'content-type': 'application/json',
        },
        body: JSON.stringify({
          personalizations: [
            {
              to: [{ email: receiver, name: 'Test Recipient' }],
            },
          ],
          from: {
            email: sender,
            name: 'Cloudflare Workers - MailChannels integration',
          },
          subject: 'Look! No servers',
          content: [
            {
              type: 'text/html',
              value: '<h1>Hello from Cloudflare worker</h1>',
            },
          ],
        }),
      })
      const resp = await fetch(send_request)
      return new Response(await resp.ok)
    },
  }
Wait, what’s happening here? Nothing cryptic here, our Cloudflare Worker is just making a POST request to Mailchannels API endpoint with sender & receiver information together with the email content. If you want to send the same email to multiple recipients, update the personalizations.to array to include more email addresses.
This is where the magic actually happens. If you’re trying to make that POST request to Mailchannels server from your local laptop or from your other server other than Cloudflare Worker, you’ll get an authentication error. This POST request will only succeed if it from Cloudflare Worker server.
Lastly, deploy the code with the following command:
$ npm run deploy

> email-service@0.0.0 deploy
> wrangler deploy

 ⛅️ wrangler 3.22.4
-------------------
Total Upload: 0.92 KiB / gzip: 0.50 KiB
Uploaded email-service (3.74 sec)
Published email-service (1.51 sec)
  https://email-service.<your subdomain>.workers.dev
Current Deployment ID: xxx
Step #4 - Test it#
Make a curl request to your Cloudflare Worker you saw in the previous npm deploy command
$ curl https://email-service.<your subdomain>.workers.dev
OK
Now check your email. You should receive email like below:

Is it really free?#
Sorry to disappoint you, I lied. The cost of sending email from Cloudflare Worker itself is free. However, since you can only send the email from Cloudflare Worker, there’s actually cost of invoking Cloudflare Worker. If you exceed their free tier (100k invocations per day), it costs $0.30 per additional million invocation in the Standard plan.
To put this into perspective, for comparison, it costs $100 to send 1M emails using AWS SES. For Sendgrid, it costs $602/month to send 1M emails. On Cloudflare Worker, outside the free tier, it costs $0.30 to send 1M emails using Cloudflare Worker + Mailchannels. You see where I’m going now, right. This pricing democratize us, the indiehackers to finally use email service for our SaaS :D
Should I use this?#
Eventhough this seems like everything you’ll need, I still not sure what’s the limit of this Cloudflare Worker + Mailchannels mailing service is, what’s the uptime SLA is like, what’s the email reputation, what’s the throughput and so on. If you’re using this for your startup, sending hundreds of email per day, this maybe works well for you. However, if you’re doing more than that, I suggest you to first engage with Cloudflare team and/or Mailchannels team first to find out what’s best for you.
Conclusion#
This is a basic way of sending email from Cloudflare Worker. This code is not ready for production use. There’re a lot of things to consider when you’re bringing this to production. How do you make this simple service reliable? How do you make it secure? How do you connect this to your existing backend service written in Laravel or Ruby on Rails? Feel free to hire me at fadhilyaacob95@gmail.com if you need some advice.
I hope you learned something new today and can use this in your startup.
I hope Cloudflare document this feature in their official Cloudflare Worker documentation page, not only in a engineering blog post posted in 2022.